In This Article
How to Use Solar Panels Without an Engineering Degree
Here’s the dirty little secret of solar: the panel is the easy part. Unfold it, point it at the sky, done — right? Not quite. Most disappointing first experiences with solar come from everything around the panel: the wrong angle, a mismatched connector, a battery that can’t accept the charge, or a cloudy-day expectation that physics simply won’t honor.
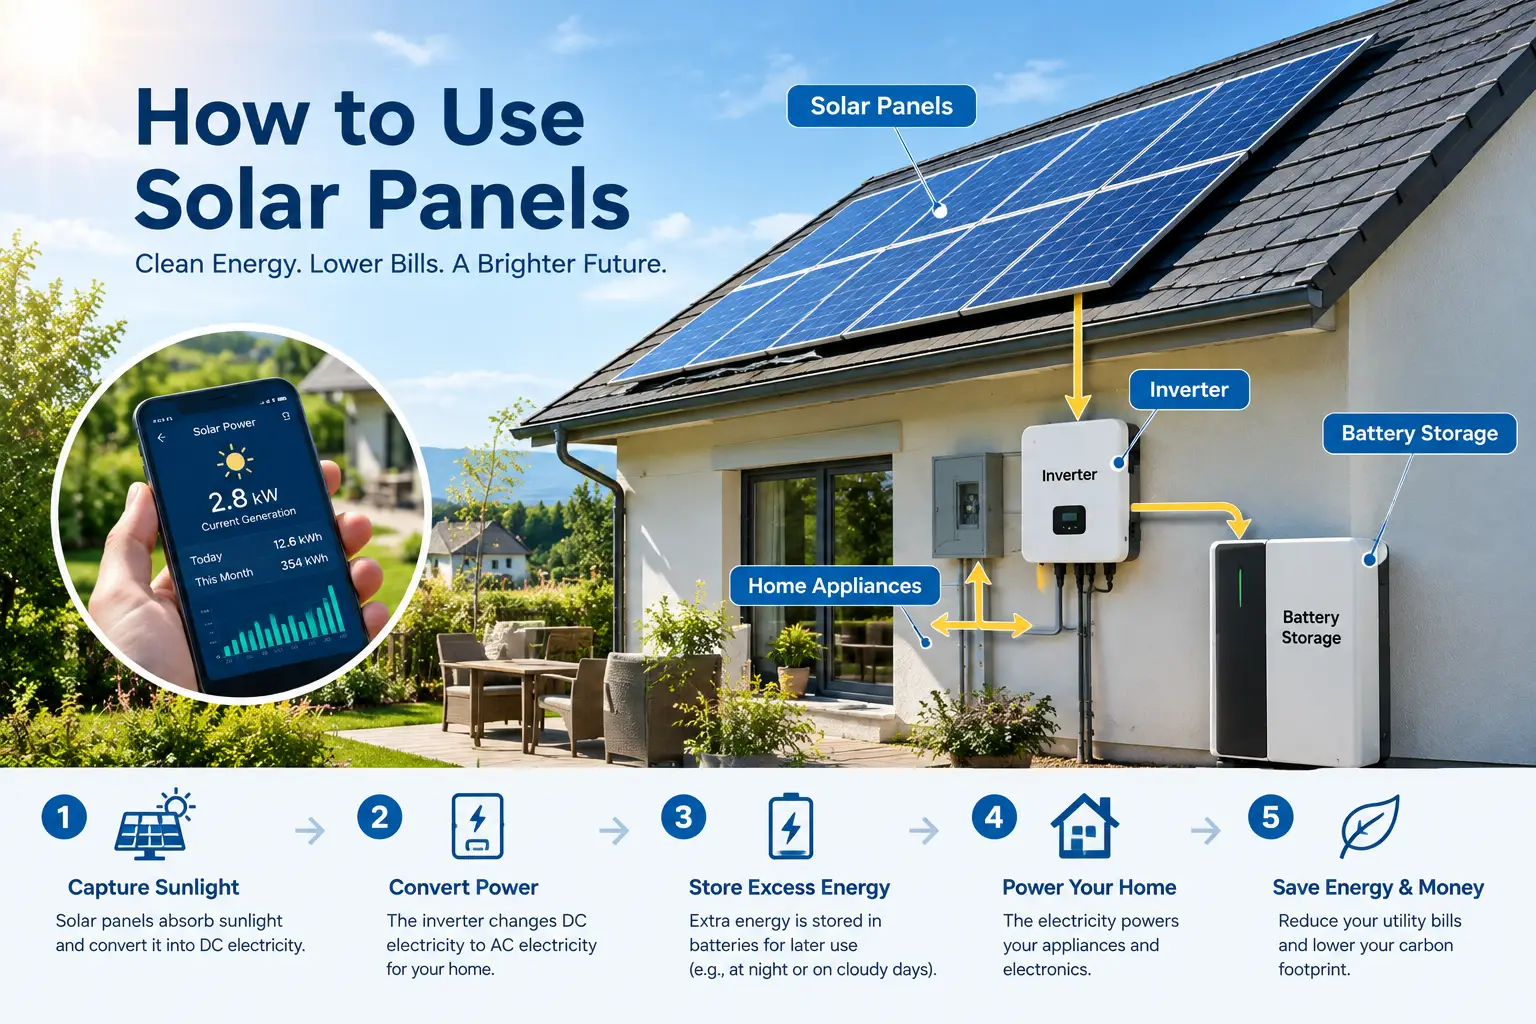
That’s why learning how to use solar panels is really about learning a small system. Once you understand how sunlight, a controller, and a battery (or a portable power station) work together, the rest is almost boringly simple. And in 2026, the hardware has never been friendlier: N-type cells at around 25% efficiency, foldable 200W panels that weigh about as much as a bag of dog food, and plug-and-play cables that work with most power stations.
What Does Using Solar Panels Actually Involve?
Using solar panels means placing photovoltaic panels in direct sun, angling them toward it, and routing their DC electricity through a charge controller into a battery or power station, which then runs or recharges your devices. Panels generate power; batteries store it; controllers keep the whole photovoltaic system safe.
In this guide, you’ll get a clear walkthrough of how to use solar panels for camping, RV trips, home backup, and everyday gadget charging — plus seven real products, analyzed honestly from spec sheets and aggregated review sentiment, so you can match the right gear to your actual life rather than to a marketing photo.
Quick Comparison: The 7 Best Solar Panels for Beginners in 2026
Before diving deep, here’s a scan-friendly snapshot. Prices are approximate ranges at the time of writing — check the current price, because solar gear prices move often.
| Product | Type | Rated Output | Approx. Weight | Approx. Price Range | Best for |
|---|---|---|---|---|---|
| BigBlue 28W Solar Charger | USB solar charger | 28W | ~1.3 lb | $50–$75 | BigBlue 28W Solar Charger: phones and hikers |
| Renogy 100W 12V Solar Starter Kit | Rigid panel + PWM controller | 100W | ~15 lb panel | $110–$170 | Renogy 100W 12V Solar Starter Kit: DIY 12V battery setups |
| Jackery SolarSaga 100W | Foldable panel | 100W | ~10.3 lb | $200–$300 | Jackery SolarSaga 100W: Jackery Explorer owners |
| Anker SOLIX PS100 | Foldable panel | 100W | ~10.6 lb | $150–$250 | Anker SOLIX PS100: Anker owners who want aiming help |
| HQST 200W Ultra-Light | Foldable N-type panel | 200W | ~11 lb | $200–$300 | HQST 200W Ultra-Light: max watts per pound |
| Renogy 200W Portable Solar Panel | Foldable N-type panel | 200W | ~13.9 lb | $200–$300 | Renogy 200W Portable Solar Panel: all-round campers |
| EcoFlow 220W Bifacial | Bifacial glass panel | 220W front / 155W rear | ~20.9 lb | $400–$650 | EcoFlow 220W Bifacial: big power stations, harsh weather |
Reading the table, the clearest pattern is the weight-to-watts jump: the HQST 200W Ultra-Light doubles the output of the 100W foldables at roughly the same carry weight, which makes most 100W portable panels hard to justify unless you need brand-matched connectors. The Renogy 100W 12V Solar Starter Kit sits in a different category entirely — it’s a permanent-mount system for batteries, not a grab-and-go panel. And the EcoFlow 220W Bifacial asks you to carry nearly twice the weight for durability and rear-side gains, a trade that only pays off if you run a large power station.
💬 One click helps other shoppers make an informed choice too! 😊
Top 7 Solar Panels for Beginners: Expert Analysis
Each pick below is a real product sold to US shoppers. The analysis is based on manufacturer spec sheets, independent reviews, and aggregated customer sentiment — not on invented hands-on claims.
1. BigBlue 28W Solar Charger — cheapest way to try solar
If you just want to keep a phone, headlamp, or power bank alive on the trail, the BigBlue 28W Solar Charger is the lowest-friction way to start. It’s a fabric foldable with USB-A and USB-C ports, so there’s no controller, no battery, and no wiring to learn.
The current version uses high-efficiency monocrystalline cells (listed around 25% efficiency) and a built-in ammeter. That little readout matters more than it sounds: it tells you instantly whether your angle is good, which is the single most useful skill in learning how to use solar panels. Keep expectations grounded, though — the rated 28W is a lab number, and USB output is split across ports.
This is for backpackers, festival-goers, and emergency go-bags. It’s not for power stations; it’s a gadget charger. Pair it with a power bank so you harvest sun during the day and charge your phone at night.
Customer reviews consistently praise its reliability for phones and power banks, even under light overcast. The common complaints are that the fabric and closures add weight, each port caps out around 12W, and a small number of buyers report a dead regulator on arrival.
Pros:
- ✅ Plug-and-play USB charging with zero setup
- ✅ Built-in ammeter makes aiming the panel easy
- ✅ Light enough to hang from a backpack
Cons:
- ❌ Can’t meaningfully charge a power station
- ❌ Per-port output limits fast charging
At roughly $50–$75, it’s the best-value way to learn solar basics before spending real money.
2. Renogy 100W 12V Solar Starter Kit — best for building a real 12V system
The Renogy 100W 12V Solar Starter Kit is the classic first step for anyone who wants permanent solar on an RV, van, shed, or boat. It bundles a rigid 100W monocrystalline panel, a 30A Wanderer PWM charge controller, a 20-ft MC4 adapter kit, tray cables, and Z-brackets.
What this means in practice: you get everything needed to charge a 12V deep-cycle battery except the battery itself. The 30A controller is oversized for one panel on purpose — it leaves room to grow to roughly 400W of panels without replacing the brain of the system. Pre-drilled holes and Z-brackets make roof mounting straightforward if you’re comfortable with a drill.
Based on comparing the specs, the trade-off is the PWM controller. It’s simple and cheap, but it wastes some potential harvest compared with MPPT, especially on cold, bright days. For a single 100W panel, that loss is small; once you scale up, an MPPT upgrade starts paying for itself.
Review sentiment, including feedback from RV owners, highlights the completeness of the kit and solid build quality. Some reviewers mention wishing it included a stand for ground use, and a few found the listing details incomplete.
Pros:
- ✅ Complete kit with cables, brackets, and controller
- ✅ Controller headroom for expanding to 400W
- ✅ Rigid aluminum-framed panel built for permanent mounting
Cons:
- ❌ PWM controller is less efficient than MPPT
- ❌ Not portable; needs mounting or a DIY stand
Usually in the $110–$170 range, it’s outstanding value for a starter 12V system.
3. Jackery SolarSaga 100W — easiest match for Jackery owners
The Jackery SolarSaga 100W exists for one main reason: it plugs straight into Jackery Explorer power stations with no adapter hunting. If that’s your setup, the convenience is genuinely worth something.
The spec sheet lists monocrystalline cells with efficiency figures quoted between 23% and 24.3% depending on the version, an ETFE-laminated surface, IP65 water resistance, and a weight of about 10.3 lb. It also includes USB-A and USB-C ports for charging a phone directly from the panel. In plain English: it’s splash-proof, not storm-proof, and it doubles as a phone charger in a pinch.
What the spec sheet doesn’t say, but reviews reveal, is how sensitive it is to angle. Independent testing found output dropping to roughly 20–30W when the panel wasn’t facing the sun well, while it got close to rated output when aimed carefully. That’s true of every panel, but it’s a reminder that 100W is a best-case number measured in a lab.
Reviewers generally praise its light, compact fold and quick kickstand setup, while noting the fabric case shouldn’t be left out in heavy rain.
Pros:
- ✅ Native compatibility with Jackery Explorer stations
- ✅ Built-in USB ports for direct device charging
- ✅ Folds compact for car camping trunks
Cons:
- ❌ Only IP65, so avoid heavy downpours
- ❌ Pricier per watt than generic 100W foldables
Around $200–$300, it’s fair value mainly if you already own a Jackery.
4. Anker SOLIX PS100 — best built-in aiming help
The Anker SOLIX PS100 is a 100W foldable designed around Anker’s SOLIX and PowerHouse stations, and its standout feature is a small one with big consequences: the Suncast alignment indicator, which shows a dot when the panel isn’t squarely facing the sun.
You also get four kickstand angles (30°, 40°, 50°, and 80°), monocrystalline cells rated up to 23% efficiency, and an IP67-rated build in the widely sold version. The 80° setting is a nice touch for winter or northern latitudes, when the sun sits low and a flatter panel loses noticeable output. Note that Anker has also released a newer bifacial PS100 variant in some markets, so double-check which version a listing shows.
Here’s what to weigh: if you’re new to solar, built-in aiming feedback quietly fixes the most common beginner mistake — a panel that’s “roughly pointed at the sun” but losing a big chunk of its output. That makes the Anker SOLIX PS100 a strong first panel for families who want a simple routine.
Professional reviews highlight the Suncast feature and weather resistance. We couldn’t verify a large body of distinct US customer-review themes beyond general satisfaction, so treat it as a well-specced but less-documented choice.
Pros:
- ✅ Suncast indicator removes guesswork when aiming
- ✅ Four kickstand angles, including a steep 80°
- ✅ IP67 build tolerates rain better than IP65
Cons:
- ❌ Best paired with Anker stations; others may need adapters
- ❌ 100W limits charging speed for large stations
Typically $150–$250, it’s good value for Anker owners who want foolproof setup.
5. HQST 200W Ultra-Light — most watts per pound
The HQST 200W Ultra-Light solves the biggest complaint about portable solar: lugging heavy panels for not much power. It packs a 200W rating into roughly 11 lb — about the weight of most 100W foldables.
It uses 16-busbar N-type cells rated up to 25% efficiency, an IP67 laminated build, and a 3-in-1 adapter cable (XT60, DC7909/8mm, and DC5521). Translation: it works with most popular power stations out of the box, and the N-type cells tend to hold output better in heat and low light than older P-type panels. Folded, it’s under 2 inches thick, so it slides behind a car seat.
On paper, this is the best pick for anyone who carries their panel more than a few yards — think tailgating, van life, or hauling solar to a backyard during outages. The catch is warranty: HQST lists a 12-month limited warranty, shorter than some rivals, which matters if you’ll use it hard every weekend.
Review roundups report one of the highest user ratings among 200W foldables, with frequent praise for the weight savings. Some reviewers note its kickstands are less refined than premium competitors.
Pros:
- ✅ 200W output at roughly 100W-panel weight
- ✅ Broad connector set fits most power stations
- ✅ IP67 build handles rain and dust
Cons:
- ❌ Shorter warranty than several competitors
- ❌ Kickstands offer less angle adjustment
In the $200–$300 range, it’s arguably the best value-per-watt in this lineup.
6. Renogy 200W Portable Solar Panel — best all-rounder for camping
The Renogy 200W Portable Solar Panel is the balanced choice: high efficiency, reasonable weight, smart handling details, and a brand with a long track record in off-grid gear.
It uses 16BB N-type cells rated at 25% efficiency, weighs about 13.9 lb, and folds into a quad design with a magnetic closure and four kickstands offering 40°, 50°, and 60° angles. It outputs via MC4 (for power stations or a 12V battery system with a controller) and includes USB-A and USB-C ports. The magnetic closure sounds like a gimmick until you’ve fought frozen Velcro at 7 a.m. at a campsite.
Who’s it for? Campers and RVers who want one panel that can feed a power station or a battery bank through a charge controller. Compared with the HQST 200W Ultra-Light, you trade about 3 lb of extra weight for more refined kickstands and USB ports.
Customer reviews report peak output around 180W in good sun, which is excellent real-world performance for a 200W rating. One recurring note: using the USB-C port while charging a station splits the total output, rather than adding to it.
Pros:
- ✅ 25% N-type efficiency with strong real-world output
- ✅ Magnetic closure and four sturdy kickstands
- ✅ Works with power stations and 12V battery systems
Cons:
- ❌ Only IP65 rated, so avoid storms
- ❌ Heavier than the ultralight 200W alternative
Around $200–$300, it delivers excellent value for regular campers.
7. EcoFlow 220W Bifacial — best for big stations and harsh weather
The EcoFlow 220W Bifacial is the premium pick, built for owners of larger EcoFlow power stations who want maximum harvest and durability. Its trick is a second solar surface on the back, rated at 155W for reflected and ambient light.
The spec sheet lists monocrystalline cells at 22–23% efficiency, tempered glass, an IP68 rating, a protective case that doubles as a kickstand, and an XT60 cable. EcoFlow claims up to 25% more energy from the bifacial design — but that gain depends heavily on what’s under the panel. On light concrete, sand, or snow, the rear side earns its keep; on dark grass, expect much less.
The honest trade-off is weight: about 20.9 lb for the panel alone, nearly double the HQST 200W Ultra-Light. That makes it ideal for RV owners and home-backup users who set up near a vehicle, and a poor choice for anyone carrying gear far.
Review sentiment generally praises its output and toughness, with weight and price being the most common reservations.
Pros:
- ✅ Rear side adds harvest on reflective surfaces
- ✅ IP68 rating and tempered glass for durability
- ✅ Case doubles as an adjustable stand
Cons:
- ❌ Heavy at roughly 21 lb
- ❌ Premium price per watt
Usually $400–$650, it’s worth it only if you’ll use the durability and rear-side gains.
✨ Don’t miss these top-rated solar picks!
🔍 Take your off-grid setup to the next level with this carefully curated lineup. Click a highlighted product name to check current pricing and availability. These picks will help you get reliable, quiet power the whole family will enjoy — from the campsite to the next blackout! ☀️🔋
How to Set Up Solar Panels: Your First-Day Walkthrough
Knowing how to set up solar panels correctly on day one prevents most of the frustration new owners report. Here’s a practical routine that works for any portable panel.
☀️ Step 1: Pick the right spot
Look for unobstructed sun from roughly 10 a.m. to 3 p.m. Even a thin tree-branch shadow across one row of cells can slash output dramatically, because cells are wired in series — one shaded cell drags down the whole string.
🧭 Step 2: Face south and tilt
In the continental US, point the panel toward true south. A good rule of thumb for tilt: angle the panel roughly equal to your latitude, flatter in summer and steeper in winter. Then use the shadow trick — adjust until the kickstand’s shadow is as short as possible.
🔌 Step 3: Connect in the right order
For a power station, plug the panel cable into the station’s solar input; the station’s built-in controller does the rest. For a battery system, always connect the charge controller to the battery first, then the panel. Disconnect in reverse.
🔄 Step 4: Re-aim every 1–2 hours
The sun moves about 15° per hour. A quick re-aim at lunch and mid-afternoon can noticeably raise your daily harvest compared with a set-and-forget panel.
🧹 Step 5: Keep it clean and cool
Wipe dust with a soft damp cloth. Lay foldables so air can circulate behind them; hot panels produce less power.
Common first-month mistakes: charging through a car window (glass cuts output), leaving IP65 panels out in storms, and judging a panel’s performance at 8 a.m. Give it midday sun before deciding it’s “underperforming.”
How to Connect Solar Panels to a Battery (Safely)
If you’re building a 12V system — say, with the Renogy 100W 12V Solar Starter Kit — learning how to connect solar panels to a battery is the core skill. Unlike power stations, a bare battery needs a separate charge controller between it and the panel. The U.S. Department of Energy’s guide to stand-alone systems calls this extra gear “balance-of-system” equipment: batteries, charge controllers, and power conditioning.
The safe wiring sequence
- Install a fuse on the positive cable between the controller and battery, sized to your controller’s rating.
- Connect the controller to the battery first. This lets the controller detect system voltage (12V vs. 24V).
- Set the battery type (AGM, gel, flooded, or LiFePO4) in the controller menu. Wrong settings are a top cause of shortened battery life.
- Connect the panel last, using MC4 connectors. Keep the panel covered or folded while connecting to avoid live voltage.
- Connect loads to the controller’s load terminals or directly to the battery through a fused distribution block.
PWM vs. MPPT: which controller?
PWM controllers essentially drag panel voltage down to battery voltage, wasting the difference. MPPT controllers convert that extra voltage into extra current, typically harvesting meaningfully more energy — especially in cold weather or with higher-voltage panel strings. For one 100W panel, PWM is fine. Above about 200W, MPPT usually justifies its higher cost.
Series or parallel?
Series wiring adds voltage (good for MPPT and long cable runs); parallel adds current (more shade-tolerant). Always keep the combined open-circuit voltage (Voc) below your controller’s maximum input — and remember that Voc rises in cold weather.
Real-World Scenarios: Matching the Right Panel to Your Life
Specs only matter in context, so here are three common profiles and the reasoning behind each match.
🏕️ The weekend car camper (budget: $200–$300)
You camp 8–10 weekends a year with a mid-size power station running a 12V fridge, lights, and phones. The Renogy 200W Portable Solar Panel is the natural fit: in good sun, its 200W rating can realistically put back several hundred watt-hours a day, enough to offset a portable fridge’s daily draw. The magnetic closure and four kickstands also make daily setup fast.
🚐 The RVer building a permanent system (budget: $150–$250 to start)
You have a 12V house battery and want it topped up while parked. The Renogy 100W 12V Solar Starter Kit gives you a roof-mount foundation, and its 30A controller leaves room to add three more panels later. Start small, track your usage for a month, then expand.
🏠 The suburban home-backup planner (budget: $400+)
You own a large power station for outages and want serious recharge capacity. The EcoFlow 220W Bifacial pairs well with a large EcoFlow unit, especially set up on a light-colored driveway where its rear side can capture reflected light. If carrying weight matters, two HQST 200W Ultra-Light panels (where your station’s input voltage allows) may deliver more total watts for a similar budget.
Across all three, the rule is the same: size your panel to your daily watt-hour use, not the other way around.
How to Choose Portable Solar Panels: 7 Steps
Choosing portable solar panels gets simple once you follow a sequence:
- Calculate your daily energy use. Add up watt-hours (watts × hours) for each device. This number drives every other choice.
- Check your power station’s solar input. Note the maximum watts, voltage range, and connector type. Exceeding input voltage can damage the station.
- Match wattage to recharge goals. A rough estimate: panel watts × peak sun hours × 0.7 ≈ realistic daily watt-hours.
- Prioritize weight if you’ll carry it. For anything beyond the trunk-to-campsite walk, watts per pound beats raw wattage.
- Look at cell type. N-type cells around 25% efficiency squeeze more power from a smaller footprint and tolerate heat better.
- Check the IP rating. IP65 means splash-resistant; IP67/IP68 handle temporary immersion and heavy rain much better.
- Read the warranty. Coverage ranges from about 12 months to several years — a real cost factor for heavy users.
The most overlooked step is number two. Plenty of buyers order a panel, then discover their station needs a different connector or can’t accept its voltage.
Solar Panel for Power Station: Compatibility Explained
Picking a solar panel for power station use comes down to three numbers and one plug. Here’s how the lineup compares on the details that decide compatibility.
| Product | Output Connector(s) | Key Electrical Note | Weather Rating | Best for |
|---|---|---|---|---|
| BigBlue 28W Solar Charger | USB-A / USB-C | 5V USB only | Splash-resistant | BigBlue 28W Solar Charger: devices, not stations |
| Renogy 100W 12V Solar Starter Kit | MC4 via controller | Charges 12V batteries | Rigid outdoor panel | Renogy 100W 12V Solar Starter Kit: battery banks |
| Jackery SolarSaga 100W | Jackery DC + USB | Native to Explorer series | IP65 | Jackery SolarSaga 100W: Jackery stations |
| Anker SOLIX PS100 | MC4/XT60 adapter options | Built for SOLIX/PowerHouse | IP67 | Anker SOLIX PS100: Anker stations |
| HQST 200W Ultra-Light | XT60, 8mm, DC5521 | Wide cross-brand fit | IP67 | HQST 200W Ultra-Light: mixed-brand owners |
| Renogy 200W Portable Solar Panel | MC4 + USB-A/USB-C | Station or controller-fed battery | IP65 | Renogy 200W Portable Solar Panel: flexible setups |
| EcoFlow 220W Bifacial | XT60 | Voc 21.8V, 13A front | IP68 | EcoFlow 220W Bifacial: EcoFlow stations |
The takeaway: brand-matched panels like the Jackery SolarSaga 100W and Anker SOLIX PS100 trade flexibility for zero-hassle setup, while the HQST 200W Ultra-Light is the safest bet if you own (or might switch to) a different brand of station. Always check your station’s maximum input voltage before wiring two panels in series — that’s where most compatibility mistakes happen.
Portable Solar Panels vs. Gas Generators
For emergency power and camping, the real competitor to portable solar panels isn’t another panel — it’s a gas generator. Here’s how they stack up.
| Factor | Solar Panel + Power Station | Gas Generator | Best for |
|---|---|---|---|
| Noise | Silent | Loud while running | Solar: campgrounds, apartments |
| Fuel cost | Free sunlight | Ongoing gas purchases | Solar: long-term savings |
| Indoor-safe output | Station can run indoors | Never run indoors (carbon monoxide) | Solar: home backup |
| Weather dependence | Needs sun | Works day or night | Generator: long cloudy stretches |
| Maintenance | Wipe panels | Oil, filters, stabilizer | Solar: low-effort owners |
The contrast is stark on safety: a gas generator must always run outdoors, far from windows, because of carbon monoxide risk, while a power station charged by solar can sit in your living room. Generators still win on sheer output and cloudy-week reliability, which is why many preppers keep both. For most campers and short-outage households, though, solar plus a station covers the essentials quietly and with almost no upkeep.
What to Expect: Everyday Performance
The biggest gap between expectations and reality is the difference between rated watts and real watts. Panel ratings come from Standard Test Conditions — a lab setting that a sunny Tuesday in Ohio rarely matches.
⚡ The realistic math
In good midday sun, well-aimed portable panels commonly deliver roughly 70–90% of their rating. Over a full day, a useful estimate is: panel watts × peak sun hours × 0.7. For a 200W panel in a location with 5 peak sun hours, that’s around 700 Wh per day — enough to recharge a mid-size power station from empty in good conditions.
Peak sun hours vary a lot by location and season. To estimate your own numbers, NREL’s PVWatts Calculator lets you enter your address and see expected monthly solar production. It’s designed for fixed installations, but it’s an excellent reality check for portable setups too.
☁️ Clouds, heat, and winter
On heavy overcast days, expect output to drop dramatically — sometimes to a small fraction of the rating. Heat also cuts output; panels lose efficiency as cell temperature rises, which is one reason N-type cells, with their better temperature behavior, are worth paying for. Winter brings shorter days and a low sun angle, so a steeper tilt (like the 80° option on the Anker SOLIX PS100) helps.
🔋 The bottom line
Solar works best as a daily top-up, not a miracle refill. Plan your battery capacity for one to two cloudy days, and treat sunny days as a bonus.
Common Mistakes to Avoid When Using Solar Panels
Even smart buyers stumble on the same handful of issues. Here’s what to watch for.
- Buying watts you can’t use. A 200W panel feeding a station capped at 100W input just wastes money. Check the station’s input spec first.
- Ignoring shade. Partial shade causes outsized losses. Move the panel instead of hoping the bypass diodes save you.
- Charging behind glass. Windows block a significant share of usable light and trap heat. Put the panel outside.
- Mismatched battery settings. Charging a LiFePO4 battery on a lead-acid profile can undercharge it or shorten its life. Set the controller correctly.
- Overlooking cold-weather voltage. Panel Voc rises in cold temps. Two panels in series that are “just under” a station’s limit in summer can exceed it on a frosty morning.
- Leaving splash-proof panels in storms. IP65 panels like the Jackery SolarSaga 100W and Renogy 200W Portable Solar Panel handle splashes, not downpours. Fold them up when rain gets serious.
- Skipping the fuse. In battery systems, an unfused cable is a fire risk. A cheap inline fuse is mandatory insurance.
Most of these mistakes cost nothing to avoid — just five minutes of reading spec sheets before you plug anything in.
Long-Term Cost and Maintenance
Solar’s upfront price is easy to see; its long-term value takes a little math. Here’s a rough value comparison across the lineup.
| Product | Approx. Price Range | Rated Watts | Approx. Cost per Watt | Best for |
|---|---|---|---|---|
| BigBlue 28W Solar Charger | $50–$75 | 28W | ~$1.80–$2.70 | BigBlue 28W Solar Charger: ultralight budgets |
| Renogy 100W 12V Solar Starter Kit | $110–$170 | 100W | ~$1.10–$1.70 (incl. controller) | Renogy 100W 12V Solar Starter Kit: lowest system cost |
| HQST 200W Ultra-Light | $200–$300 | 200W | ~$1.00–$1.50 | HQST 200W Ultra-Light: value per portable watt |
| EcoFlow 220W Bifacial | $400–$650 | 220W | ~$1.80–$2.95 | EcoFlow 220W Bifacial: durability buyers |
The cost-per-watt column shows why 200W foldables like the HQST 200W Ultra-Light and Renogy 200W Portable Solar Panel dominate value rankings, while the EcoFlow 220W Bifacial charges a premium for glass, IP68 sealing, and rear-side harvest. The Renogy 100W 12V Solar Starter Kit looks cheapest of all, but remember you still need to budget for a battery.
🧽 Maintenance that actually matters
- Monthly: wipe panels with water and a soft cloth; avoid abrasive cleaners that can scratch ETFE coatings.
- Every trip: inspect cables and connectors for cracks, corrosion, or bent pins.
- Seasonally: check mounting bolts on rigid panels and tighten as needed.
- Storage: keep foldables dry and flat-ish; repeated sharp folding in freezing temperatures can stress cells.
Well-cared-for panels typically last many years, so your real long-term cost is often the battery or power station, not the panel.
Safety, Regulations, and Standards
Small portable setups are low-risk, but a few standards and rules are worth knowing — especially as you scale up.
🛡️ Understanding IP ratings
The IP code rates protection against dust and water. The first digit covers solids; the second covers liquids. IP65 resists water jets (rain splashes), IP67 survives temporary immersion, and IP68 handles longer immersion under conditions the manufacturer specifies. Note that some listings rate only the junction box, not the whole panel — read carefully.
⚙️ Certifications to look for
For rigid, permanently installed modules, look for listing to UL 61730 (the current US safety standard for PV modules, which replaced UL 1703) or an equivalent recognized certification. For power stations and chargers, a recognized safety listing (UL or ETL mark) and FCC compliance for electronics are good signs of tested build quality.
🏗️ Permanent installations and codes
Roof-mounted systems on RVs and cabins should follow good DC wiring practice: correctly sized wire, fuses or breakers, and secure strain relief. Fixed home and building systems fall under the National Electrical Code (Article 690 covers solar PV), plus local permit rules — and anything tied into your home’s wiring or the grid should involve a licensed electrician and your utility.
🔥 Everyday safety tips
Never short MC4 connectors, keep cables out of foot traffic, and don’t leave power stations charging in a hot, closed car. Common sense goes a long way.
FAQs
❓ Can I plug a solar panel directly into my phone?
❓ How many solar panels do I need for a power station?
❓ Do solar panels work through a window?
❓ Can I leave portable solar panels outside overnight?
❓ Is a 100W or 200W solar panel better for beginners?
Conclusion: Start Small, Aim Smart, Scale Later
Learning how to use solar panels isn’t about mastering electrical engineering — it’s about understanding a simple chain. The sun hits the cells, a controller manages the charge, and a battery or power station stores it for later. Get the angle right, avoid shade, match your connectors, and respect your battery’s settings, and you’ll be harvesting free energy within an afternoon.
If you’re just testing the waters, the BigBlue 28W Solar Charger is a low-risk way to see solar work in your hands. If you’re building a permanent 12V system, the Renogy 100W 12V Solar Starter Kit gives you the foundation and room to grow. For power-station owners, the HQST 200W Ultra-Light and Renogy 200W Portable Solar Panel deliver the best balance of watts, weight, and price, while the Jackery SolarSaga 100W and Anker SOLIX PS100 reward brand loyalty with frictionless setup. And if durability and maximum harvest matter most, the EcoFlow 220W Bifacial is built for the long haul.
Whichever you choose, start by calculating your daily watt-hours. That one number turns solar from guesswork into a plan — and turns sunny days into stored, silent, fuel-free power.
🌞 Ready to harness the sun?
🔍 Pick the panel that fits your power needs, click its highlighted name to check current pricing and availability, and start your solar journey this weekend. Your next campsite — or your next blackout — will feel a whole lot brighter! ⚡🔋
Recommended for You
- Electric Generator Brands: 7 Best Picks You Can Trust in 2026
- Generator for Travel Trailer AC: 7 Best Picks That Won’t Trip (2026)
- Generator for RV Air Conditioner: 7 Best Picks That Won’t Quit (2026)
Disclaimer: This post contains affiliate links. As an Amazon Associate, I earn from qualifying purchases made through these links, at no additional cost to you.
✨ Found this article helpful? Share it with someone who needs it! 💬🤗