
In This Article
If you’ve ever stared at a pile of cables, brackets, and unlabeled black boxes after unboxing a solar kit, you already know the truth: the panel is the easy part. Solar panel parts and components — the charge controllers, connectors, mounting hardware, combiner boxes, inverters, and monitors that turn a slab of glass into a working power system — are where most DIY installs actually succeed or fail. Skimp on the wrong piece and you’ll either fry a battery, melt a connector, or spend a weekend troubleshooting a system that should have just worked.
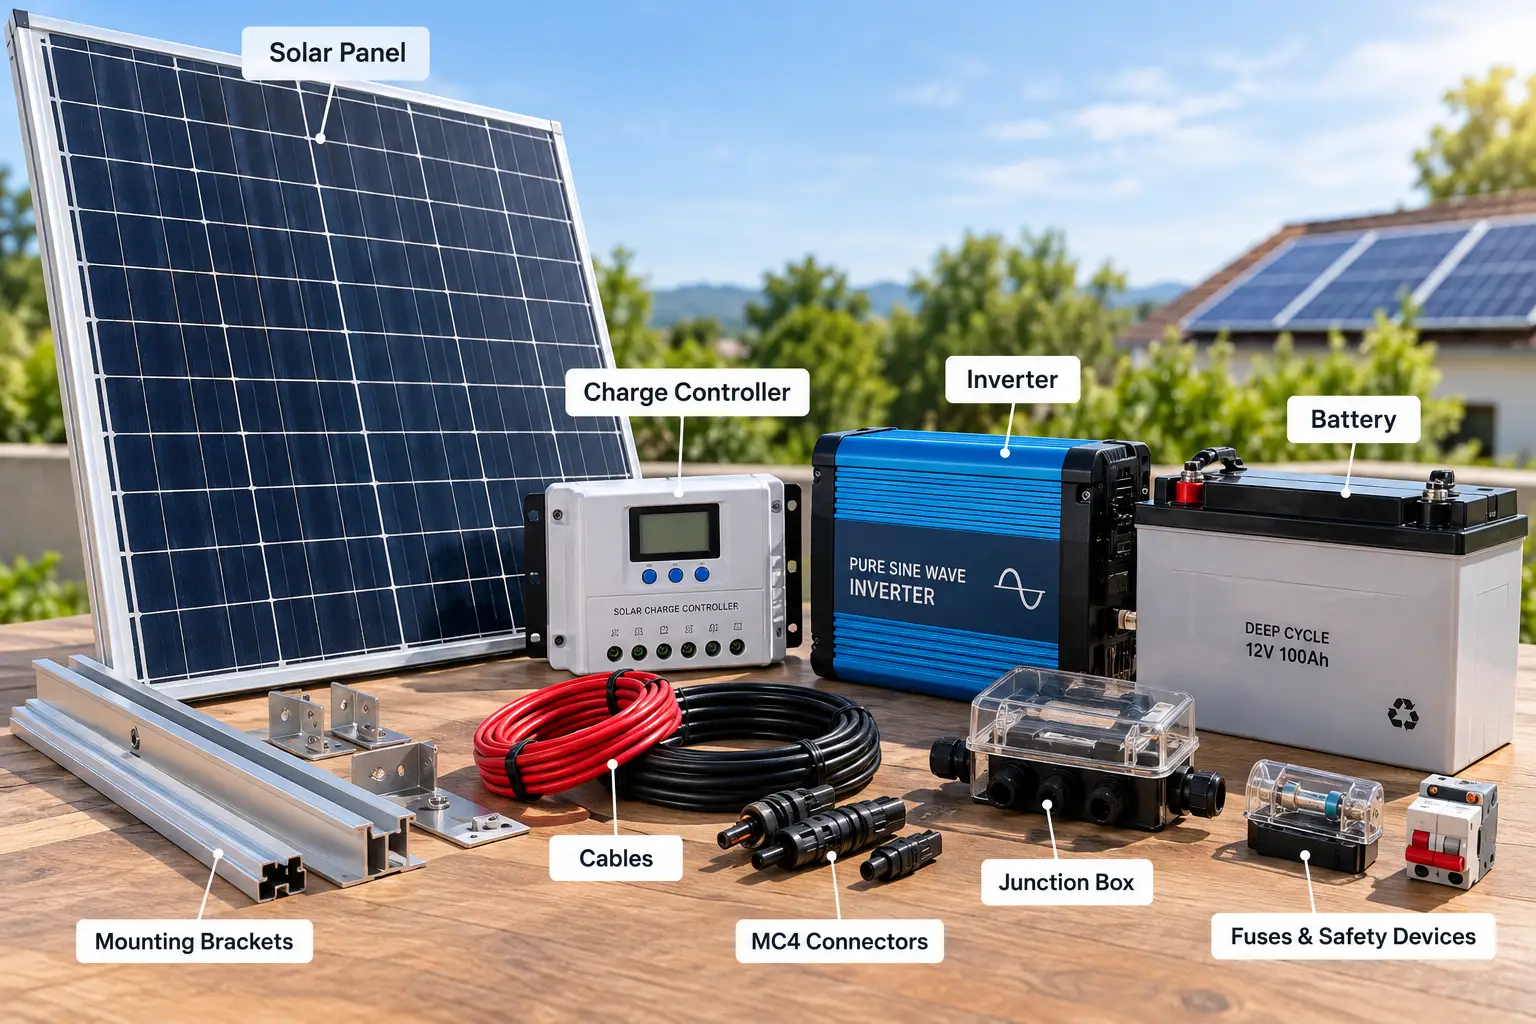
What Is Solar Panel Parts and Components? Solar panel parts and components refer to every piece of hardware a photovoltaic system needs beyond the panel itself — charge controllers, MC4 connectors, mounting brackets, combiner boxes, inverters, and battery monitors — collectively known as the “balance of system” that safely converts, protects, and delivers solar-generated power.
This guide walks through seven real, currently available products that cover the full stack: two charge controllers (one premium, one value-focused), MC4 connectors, mounting brackets, a combiner box, a pure sine wave inverter, and a battery monitor. As the U.S. Department of Energy explains, PV modules are only one part of a complete photovoltaic system, and getting the supporting components right matters just as much as picking a good panel. Whether you’re wiring an RV, building an off-grid cabin, or adding a home backup system, you’ll find honest comparisons, real aggregated review sentiment, and the kind of practical guidance that a spec sheet alone won’t give you.
Disclosure: This post contains affiliate links. As an Amazon Associate, I earn from qualifying purchases made through these links, at no additional cost to you.
Quick Comparison: Solar Panel Parts and Components at a Glance
Before diving into full reviews, here’s a fast reference for which category of solar panel component you’re actually shopping for.
| Component Category | What It Does | Typical Price Range | Best For |
|---|---|---|---|
| MPPT Charge Controller | Regulates panel-to-battery charging, maximizes harvest | $110–$180 | Any system over 200W |
| MC4 Connectors | Waterproof panel-to-wire connections | Under $20 | Every install, without exception |
| Mounting Brackets | Physically secures panels to a surface | $11–$45 | RVs, boats, sheds, flat roofs |
| Combiner Box | Merges multiple panel strings, adds overcurrent protection | $35–$65 | Multi-panel arrays |
| Pure Sine Wave Inverter | Converts battery DC power to usable AC | $200–$320 | Running household appliances off-grid |
| Battery Monitor | Tracks state of charge, voltage, and runtime | $150–$230 | Lithium or AGM battery banks |
Looking at the table above, notice that the cheapest items — connectors and brackets — are also the ones most people skip researching, even though a failed MC4 connector or an undersized bracket can take down an entire array. Meanwhile, the charge controller and inverter carry the highest price tags because they do the most electrically demanding work: converting and regulating real power, not just physically holding things together. Budget-conscious buyers should prioritize spending on the controller and inverter first, then invest in quality connectors and mounts rather than treating them as an afterthought.
💬 Bookmark this comparison — you’ll want to reference it as you build your parts list below!
Top 7 Solar Panel Parts and Components for 2026
1. Victron SmartSolar MPPT 100/30 — fastest MPPT tracking on the market
The standout feature here is tracking speed: this controller locks onto the maximum power point noticeably faster than budget competitors, which matters most when clouds are moving across the sky and panel voltage is constantly shifting.
Under the hood, it’s a 100V, 30A MPPT controller with built-in Bluetooth that connects directly to the free VictronConnect app — no separate dongle required. That means real-time charging data, 30-day performance history, and battery-profile customization from your phone. It also supports controller syncing, so if your array grows later, you can run multiple SmartSolar units in parallel with coordinated charging rather than each controller fighting the others for priority.
Based on comparing the specs against Renogy’s Rover line, the SmartSolar’s main edge isn’t raw wattage capacity — it’s tracking precision and long-term reliability in demanding, always-on installations. This is the controller to buy if you’re building a permanent off-grid cabin or a system you don’t want to think about again for a decade; it’s arguably overkill for a single 100W panel on a weekend camper.
Review sentiment across RV and off-grid solar communities consistently ranks the SmartSolar line as the top pick for reliability and app experience, with testers specifically calling out its Bluetooth range and firmware-update convenience as standout conveniences compared to rival brands.
Pros:
- ✅ Fastest MPPT tracking speed in independent bench comparisons
- ✅ Built-in Bluetooth with no separate dongle needed
- ✅ Supports parallel controller syncing for system growth
Cons:
- ❌ Costs noticeably more than comparable Renogy models
- ❌ 30A capacity is modest for larger multi-panel arrays
Expect to pay in the $130–$180 range at the time of writing, and always check the current price before ordering since availability shifts. For a permanent installation where you’ll never touch the controller again after setup, the Victron SmartSolar MPPT 100/30 earns its premium; for a casual, occasional-use setup, it’s more controller than most people need.
2. Renogy Rover 40A MPPT Charge Controller — best value MPPT performance
What sets the Rover apart at this price point is that it delivers genuinely close-to-premium MPPT efficiency without the Victron price tag — reviewers consistently flag it as the “best value” pick among budget-friendly controllers.
The Rover uses true MPPT conversion (not PWM), auto-detects 12V or 24V systems, and is rated for 40A, giving it more headroom than the Victron 100/30 for slightly larger arrays. In practice, that efficiency difference is significant: MPPT controllers typically harvest 20–30% more usable energy than PWM units, especially in cold weather or with higher-voltage panels, so the Rover isn’t just “cheaper,” it’s a legitimately different technology tier from bargain-bin PWM controllers.
Here’s what most buyers overlook with this model: the Rover’s Bluetooth monitoring module is often a separate add-on purchase rather than built in, unlike the Victron SmartSolar. If app-based monitoring matters to you, factor that extra cost and step into your buying decision rather than assuming it’s included out of the box.
Reviews consistently describe the Rover as durable and suitable across a wide range of applications — from RV and van conversion builds to small industrial off-grid systems — with the main complaint being that it lacks some of the advanced networking features found in the Victron ecosystem.
Pros:
- ✅ Near-premium 98% MPPT efficiency at a fraction of Victron pricing
- ✅ Auto-detects 12V/24V for flexible battery bank setups
- ✅ Higher 40A capacity than the Victron 100/30 for larger arrays
Cons:
- ❌ Bluetooth monitoring typically requires a separate add-on module
- ❌ Fewer multi-unit networking features than the Victron ecosystem
Pricing typically falls between $110 and $150, making it one of the best dollar-for-dollar upgrades over a PWM controller. If your budget forces a choice between a fancier inverter and a real MPPT controller, put the money here — the Renogy Rover 40A MPPT Charge Controller is the smarter long-term investment.
3. Renogy 5-Pair MC4 Solar Panel Cable Connectors — the connector every system actually needs
The distinguishing benefit is simple: these are genuine, correctly-sized MC4-style connectors built for the specific job of joining solar panel leads to your wiring — not generic electrical connectors repurposed for solar use.
Each pair is waterproof and dust-resistant with a double-seal design, made from copper or brass contacts (often silver-plated) to reduce resistance and corrosion at the connection point. They’re designed for a snap-in, tool-free installation and are rated to work across a range of wire gauges, from roughly 16 AWG up through 10 AWG, which covers the vast majority of small-to-midsize DIY solar builds.
What the spec sheet doesn’t say, but forum discussion reveals, is that the MC4 connector market is flooded with clone parts that don’t carry genuine manufacturer markings — an issue worth knowing about if you’re mixing connectors from multiple panel brands, since real MC4 connectors are generally cross-compatible across brands while some clones are not. If you’re combining panels from different manufacturers, stick with connectors from one trusted source for the entire run.
Aggregated customer reviews are mixed but mostly positive: several buyers on Home Depot’s site report the connectors working reliably across multiple wire gauges, while a smaller number describe the retaining clips breaking during disconnection — worth keeping in mind if you expect to frequently unplug and reconnect panels rather than making a permanent connection.
Pros:
- ✅ Double-sealed, waterproof design built for outdoor exposure
- ✅ Compatible with a wide range of wire gauges (16–10 AWG)
- ✅ Tool-free snap installation speeds up wiring day
Cons:
- ❌ Some users report retaining clips breaking on repeated disconnection
- ❌ Clone connectors in the broader market can create cross-brand compatibility issues
At under $20 for a five-pair set, this is one of the cheapest line items in your whole build — and one of the worst places to cut corners, since a failed connector can take an entire string offline. The Renogy 5-Pair MC4 Solar Panel Cable Connectors deliver solid value for the price, especially for permanent installs where the clips won’t be repeatedly flexed.
4. Renogy Solar Panel Mounting Z Brackets (Set of 4) — lightest, most affordable mounting option
The short version: this is the cheapest legitimate way to physically secure a small-to-midsize panel to an RV roof, boat deck, or shed wall, and it comes with every fastener you need in the box.
Constructed from corrosion-resistant aluminum, the Z-bracket design uses four L-shaped brackets bolted to the panel frame and then screwed or through-bolted to your mounting surface. Renogy rates a single set for panels up to roughly 150–200W; anything larger needs two sets per panel to distribute the load and wind stress properly, which is a detail easy to miss when comparing prices against the mounting kit for a bigger array.
Here’s the honest trade-off buyers should weigh: these brackets are inexpensive and effective, but because they’re generally installed with permanent fasteners (often combined with roofing sealant on RVs), removing panels later for periodic roof maintenance — like resealing an RV roof — becomes more labor-intensive than with a rail-based mounting system. If you expect to remove and reinstall panels regularly, budget extra time for that maintenance cycle.
Real customer feedback is largely favorable: Home Depot reviewers frequently describe the kit as “convenient” and complete with all necessary hardware, while a notable minority flag the resealing hassle mentioned above as an ongoing annoyance for RV owners specifically.
Pros:
- ✅ Includes all mounting hardware — no extra trip to the hardware store
- ✅ Lightweight, corrosion-resistant aluminum construction
- ✅ Works on flat, curved, and irregular surfaces alike
Cons:
- ❌ Not rated for single panels over roughly 150–200W without doubling up
- ❌ Permanent-style mounting complicates future roof resealing on RVs
At around $11 to $15 per set at the time of writing, this is genuinely one of the best value purchases on this whole list. If you’re mounting a single 100W–150W panel, the Renogy Solar Panel Mounting Z Brackets are hard to beat on price and simplicity.
5. Renogy 5 Strings Solar PV Combiner Box — best for multi-panel arrays
The standout benefit is capacity: this box lets you merge up to five separate panel strings into a single output while adding proper overcurrent protection to each string individually — something a simple Y-connector setup can’t do safely at scale.
Inside the cold-formed steel enclosure, you’ll find a built-in DIN rail that accepts up to five 1-pole circuit breakers (one per string) plus a slot for a 2-pole surge protection device, which helps guard your charge controller and battery bank against lightning-induced voltage spikes. The steel housing includes a rain cap and rubber seals designed to survive outdoor exposure, and knockouts are pre-positioned for waterproof strain reliefs or conduit runs.
What most buyers overlook with combiner boxes generally is the enclosure rating: this model carries an IP55 rating, which protects against dust and low-pressure water jets but is not the same as the IP65 rating some inspectors require in certain jurisdictions or wet-location installs. One forum user specifically flagged that the product description doesn’t state a NEMA rating, which could matter if your local permitting office requires that specific certification — always verify with your local inspector before finalizing a permitted installation.
Aggregated feedback from the DIY solar community is strongly positive on build quality and physical size relative to price, with one widely-echoed comment describing the enclosure as “huge” and “great quality” for the cost, though breakers and the surge protection device are typically sold separately from the box itself.
Pros:
- ✅ Combines up to 5 panel strings with individual breaker protection
- ✅ Robust cold-formed steel enclosure built for outdoor exposure
- ✅ DIN rail simplifies breaker and component installation
Cons:
- ❌ IP55 rating may not satisfy every jurisdiction’s inspection requirements
- ❌ Breakers and surge protection device are usually sold separately
Pricing generally sits between $35 and $45, not counting the breakers you’ll add. For anyone running more than two panel strings, the Renogy 5 Strings Solar PV Combiner Box is close to mandatory rather than optional — it’s the safety backbone of a multi-panel array.
6. Renogy P2 2000W Pure Sine Wave Inverter — cleanest power for sensitive electronics
The distinguishing benefit is output quality: this inverter produces true pure sine wave AC power, which mimics grid electricity closely enough to safely run laptops, medical equipment, and other sensitive electronics without the buzz or interference cheaper modified-sine inverters can cause.
Rated for 2000W continuous output with a 4000W surge capacity, the P2 can handle common household loads — a microwave plus refrigerator plus a few lights, for example — and briefly absorb the startup surge that motors and compressors draw when they kick on. Conversion efficiency runs above 90%, and the unit is UL 458 certified, a certification specifically relevant to inverters used in RV and mobile power applications. Built-in protections cover under-voltage, over-voltage, over-temperature, overload, and short circuit conditions, plus GFCI protection for added safety around wet environments.
On paper, this means you’re getting inverter-charger-grade safety features at a mid-range inverter price. Reviewers who’ve compared it against generic off-brand competitors consistently note the build quality and thermal management as standout strengths — it runs quieter and cooler under sustained load than cheaper alternatives in the same wattage class, which matters if the inverter lives inside a living space like a van or tiny cabin.
The tradeoff worth flagging honestly: a 4000W surge rating, while generous, can still be insufficient for simultaneously starting a large air conditioner compressor and a refrigerator on the same circuit. If your appliance list includes a large AC unit, size your inverter (or stagger your loads) accordingly rather than assuming 2000W continuous automatically covers everything.
Pros:
- ✅ UL 458 certified for RV and mobile installation compliance
- ✅ True pure sine wave output protects sensitive electronics
- ✅ Multiple layered safety protections including GFCI
Cons:
- ❌ 4000W surge may not cover simultaneous large-appliance startups
- ❌ Wired remote’s cable length can limit mounting placement flexibility
Expect a price between $200 and $300 depending on current promotions — always check the listing for the latest figure rather than relying on a printed price. For anyone running a genuine off-grid or backup AC power setup, the Renogy P2 2000W Pure Sine Wave Inverter is the component that finally makes stored solar power usable for everyday appliances.
7. Victron BMV-712 Smart Battery Monitor — most complete state-of-charge visibility
The standout feature is flexibility: it’s one of the few battery monitors on the market that gives you both a physical display and Bluetooth app monitoring in the same unit, a combination competitors typically split across two separate product tiers.
The BMV-712 pairs a 500A shunt with a display screen that shows state of charge, voltage, current draw, and estimated time remaining at a glance — genuinely useful if you want information without pulling out your phone. It also includes a second input that can be configured to track battery temperature, midpoint voltage on a series bank, or the voltage of a secondary battery, plus a programmable relay that can trigger other equipment based on battery conditions you set.
Here’s what most buyers overlook: the real value of this monitor compounds if you already own other Victron gear, since the BMV-712 can share data with a compatible MPPT controller to compensate for voltage drop across long wire runs — a feature that has no equivalent if you’re mixing brands. Independent testers who’ve compared it side-by-side with the cheaper Victron SmartShunt and Renogy’s 500A monitor describe the BMV-712 as excellent but genuinely “overkill for most people” purely on cost, recommending the screen-free SmartShunt instead for buyers who are comfortable checking a phone app.
Review sentiment is close to universally positive on reliability and ease of setup, with the most common critique being that the auxiliary mounting bracket isn’t ideally suited for mobile, vibration-heavy applications like off-road vehicles.
Pros:
- ✅ Rare combination of physical display plus Bluetooth app access
- ✅ Auxiliary input doubles as a temperature or second-battery sensor
- ✅ Integrates with Victron MPPT controllers for wiring-loss compensation
Cons:
- ❌ Genuinely more monitor than most casual users need, given the price
- ❌ Included mounting bracket isn’t ideal for high-vibration mobile installs
Pricing generally runs in the $170 to $230 range at the time of writing, well above budget shunt-only monitors. If you’re already invested in the Victron ecosystem or you simply want the most complete picture of your battery bank’s health, the Victron BMV-712 Smart Battery Monitor is worth the premium; casual users may be just as happy with a cheaper Bluetooth-only shunt.
Top 7 Products: Full Comparison Table
| Product | Category | Price Range | Rated Capacity | Best For |
|---|---|---|---|---|
| Victron SmartSolar MPPT 100/30 | Charge Controller | $130–$180 | 30A / 100V | Permanent off-grid installs |
| Renogy Rover 40A MPPT Charge Controller | Charge Controller | $110–$150 | 40A | Budget-conscious RV/van builds |
| Renogy 5-Pair MC4 Solar Panel Cable Connectors | Connectors | Under $20 | 16–10 AWG | Every install |
| Renogy Solar Panel Mounting Z Brackets | Mounting Hardware | $11–$15 | Up to 150–200W panels | Single small-panel mounting |
| Renogy 5 Strings Solar PV Combiner Box | Combiner Box | $35–$45 | 5 strings | Multi-panel arrays |
| Renogy P2 2000W Pure Sine Wave Inverter | Inverter | $200–$300 | 2000W / 4000W surge | Running household appliances |
| Victron BMV-712 Smart Battery Monitor | Battery Monitor | $170–$230 | 500A shunt | Lithium or AGM battery banks |
Scanning this table, a clear pattern emerges: the Renogy Rover 40A MPPT Charge Controller and Renogy 5 Strings Solar PV Combiner Box offer the strongest value-per-dollar for builders assembling a system from scratch, while the Victron SmartSolar MPPT 100/30 and Victron BMV-712 Smart Battery Monitor target buyers who already know they want premium reliability and app-based control. Budget-conscious buyers should note that spending more on the Renogy P2 2000W Pure Sine Wave Inverter rather than a bargain inverter tends to pay off fastest, since inverter failures are among the most common and disruptive solar system problems reported in DIY forums.
✨ Ready to start building your parts list? Click through to check today’s pricing on each pick above!
How to Install and Wire Your Solar Panel Components: A Step-by-Step Guide
Getting your components in the right order matters as much as picking good ones. Here’s the general sequence that avoids the most common rookie mistakes.
1. Size your charge controller before you buy anything else. Multiply your panel array’s short-circuit current by 1.25 to find your minimum controller amperage. For example, a 1,000W array on a 24V battery bank needs roughly 52A of controller capacity after applying the safety margin — undersizing here is the single most common wiring mistake in first-time builds.
2. Mount the panels first, but leave the wiring loose. Install your Renogy Solar Panel Mounting Z Brackets (or equivalent) before running any cable, and resist the urge to permanently route wiring until you’ve confirmed panel placement and angle actually works for your space.
3. Connect panels to the combiner box, if you have more than one string. This is where the Renogy 5 Strings Solar PV Combiner Box comes in — each string gets its own breaker before the combined output heads to your charge controller, protecting the whole array from a single failed string.
4. Join everything with matched connectors. Use genuine Renogy 5-Pair MC4 Solar Panel Cable Connectors (or connectors from a single trusted brand throughout) rather than mixing brands, and always test polarity with a multimeter before the final connection.
5. Install the charge controller close to the battery bank. Shorter cable runs between the controller and battery reduce voltage drop and improve charging efficiency — this is also where a unit like the Victron SmartSolar MPPT 100/30 earns its keep with fast, accurate tracking even on marginal wire runs.
6. Add your battery monitor at the battery terminal, not downstream. The Victron BMV-712 Smart Battery Monitor‘s shunt needs to sit directly at the negative battery terminal, with all loads and charging sources wired through it, so it can accurately track every amp in and out.
7. Wire the inverter last, directly off the battery bank. Keep inverter cable runs as short as practical — voltage drop on the DC side between battery and inverter is one of the most overlooked sources of underperformance in a finished system.
Common first-30-days mistakes include forgetting to torque busbar connections to spec (loose connections cause resistance heating over time), skipping a fuse between the battery and inverter, and mounting the charge controller in direct sun where its internal temperature sensor throttles output unnecessarily.
Real-World Scenarios: Matching Components to Your Setup
The weekend van-lifer on a budget. If you’re running a single 200W panel and a small AGM battery for weekend trips, you don’t need premium gear. The Renogy Rover 40A MPPT Charge Controller paired with Renogy Solar Panel Mounting Z Brackets and a basic set of Renogy 5-Pair MC4 Solar Panel Cable Connectors covers the essentials without overspending — skip the combiner box entirely since you only have one string.
The full-time off-grid cabin owner. With a multi-panel array feeding a lithium battery bank that needs to last years without a hiccup, this is where premium components justify their price. The Victron SmartSolar MPPT 100/30, the Renogy 5 Strings Solar PV Combiner Box for your multiple strings, and the Victron BMV-712 Smart Battery Monitor for precise state-of-charge tracking form a setup built for reliability over convenience shopping.
The homeowner building emergency backup power. If your priority is running a refrigerator, some lights, and a few outlets during a grid outage, the Renogy P2 2000W Pure Sine Wave Inverter becomes the centerpiece of your build. Pair it with a mid-tier charge controller and a battery monitor so you always know exactly how much runtime you have left before the lights go out.
How to Choose Solar Panel Parts and Components
- Start with your total wattage, not your budget. Add up every panel’s rated wattage first — this number determines your minimum charge controller amperage and inverter capacity, and skipping this step leads to expensive undersizing mistakes later.
- Match your battery chemistry to every downstream component. Lithium (LiFePO4) and lead-acid batteries have different charging profiles; confirm your charge controller and inverter both support your specific battery chemistry before purchasing.
- Choose MPPT over PWM for any system over roughly 200W. The efficiency gap is real and compounds over the system’s lifetime, particularly in cold weather or cloudy conditions.
- Buy connectors and breakers rated above your actual current draw. A 15–25% safety margin on every connector and breaker prevents overheating under peak load conditions.
- Check the enclosure rating on outdoor components. IP55 handles dust and light rain; IP65 or better is worth seeking out for combiner boxes and junction points in genuinely wet climates.
- Verify certification markings before you buy. Look for UL, ETL, or equivalent listings on inverters and combiner boxes, especially if your installation will be inspected or is a permanent home addition.
- Budget for a battery monitor even if it feels optional. Guessing at remaining battery capacity is how most off-grid systems end up with an unexpectedly dead battery bank.
MPPT vs PWM Charge Controllers: What’s the Real Difference?
The core distinction comes down to how each technology handles excess panel voltage. A PWM (Pulse Width Modulation) controller essentially acts as a switch, directly connecting the panel to the battery and pulsing the connection on and off to regulate charging — but it can’t use any panel voltage above the battery’s voltage, wasting that extra potential as heat. An MPPT (Maximum Power Point Tracking) controller, by contrast, actively converts excess panel voltage into additional charging current, which is why MPPT controllers typically harvest 20–30% more usable energy from the same panels, especially in cold weather or with higher-voltage panel configurations.
| Factor | PWM Controllers | MPPT Controllers |
|---|---|---|
| Typical Efficiency | 75%–85% | Up to 98% |
| Best Panel Voltage Match | Panel voltage ≈ battery voltage | Panel voltage can exceed battery voltage |
| Typical Price | $20–$60 | $110–$180 |
| Best For | Small 12V systems under 200W | Systems over 200W, or 24V/48V banks |
The practical takeaway: if you’re running a small single-panel system where panel voltage naturally matches your battery voltage, a PWM controller can still make sense and save real money. But for anything larger — or any 24V/48V battery bank — the efficiency gap alone typically pays back an MPPT controller’s higher upfront cost within the first year or two of use, particularly for cloudy or cold-climate regions where the efficiency difference is most pronounced.
💬 Not sure which controller fits your system size? Check current pricing on the MPPT picks above to compare specs side by side!
Common Mistakes to Avoid When Buying Solar Panel Components
Undersizing wire gauge for the actual current draw is one of the most frequent and dangerous mistakes — thinner wire than your amperage requires can overheat under sustained load, which is exactly why matching connector and breaker ratings to real current draw (not just “close enough”) matters so much. Buying a charge controller sized for today’s panel count without planning for future array expansion is another common regret; it’s cheaper to buy slightly more controller capacity upfront than to replace the whole unit later. Skipping a combiner box on a multi-string array to save money is a false economy — without individual string protection, a single shorted string can damage the entire array. Finally, many first-time buyers assume all MC4-style connectors are interchangeable across brands; while genuine MC4 connectors generally are, budget clone connectors sometimes aren’t, so sticking with one connector source for your whole build reduces the risk of a poor mechanical seal.
Solar Panel Components for Off-Grid vs Grid-Tied Systems
Off-grid systems rely entirely on the components covered in this guide — charge controller, battery bank, monitor, and inverter — because there’s no utility connection to fall back on if something fails, which is why redundancy and monitoring matter more for these builds. Grid-tied systems, by contrast, typically skip the charge controller and battery monitor entirely in favor of a grid-tie inverter that synchronizes directly with utility power, though many homeowners now add battery storage components to grid-tied systems specifically for backup power during outages, effectively creating a hybrid system that needs many of the same components discussed here. If you’re unsure which category your project falls into, the deciding factor is simple: if losing utility power means losing all power, you need the full off-grid component stack regardless of whether you’re also grid-connected.
Long-Term Cost and Maintenance of Solar Panel Components
Charge controllers and inverters are generally the components most likely to need replacement within a system’s lifespan — the Department of Energy notes that inverters typically need replacement at least once during a PV array’s 25-year lifetime, which is worth factoring into your long-term budget rather than assuming a one-time purchase covers you for the panel’s entire service life. Connectors and mounting hardware, by contrast, are largely “buy once” purchases if you choose quality parts upfront, since replacing a failed MC4 connector mid-array is far more disruptive than the modest cost difference between a budget and premium connector would suggest. Combiner boxes and battery monitors sit in the middle: they’re built to last many years but benefit from periodic inspection — checking breaker function, cleaning enclosure seals, and confirming shunt readings against a multimeter once or twice a year catches small problems before they become expensive ones. National laboratory guidance on photovoltaic operations and maintenance recommends keeping a documented inventory of parts and sourcing information for replacement components so that when something does eventually fail, you’re not starting your research from zero under time pressure.
Safety, Regulations, and Standards for Solar Panel Components
Certification markings matter more than they might seem on a spec sheet. UL and ETL listings on inverters and combiner boxes indicate the product has passed independent safety testing for fire and shock hazards — this is especially relevant for permanent home installations subject to local electrical inspection, where uncertified equipment can fail an inspection outright regardless of how well it performs. Lithium battery components deserve particular attention: the Consumer Product Safety Commission has issued real recalls involving lithium battery thermal and fire hazards in solar power storage products, which is a reminder to buy battery components — and any component that directly interfaces with a lithium bank, like your charge controller and monitor — from established manufacturers with a track record rather than the cheapest unbranded listing available. For permanent residential installations, local electrical code (generally based on the National Electrical Code) typically governs conductor sizing, overcurrent protection, and disconnect requirements; DIY builders installing a permanent system should confirm requirements with their local permitting office before finalizing component choices, since some jurisdictions have specific enclosure rating or labeling requirements that go beyond manufacturer defaults.
Features That Actually Matter (and Ones That Don’t)
MPPT tracking speed and conversion efficiency are features that genuinely matter — they directly affect how much usable power you actually get from panels you’ve already paid for. Certification markings (UL, ETL) matter for safety and code compliance, not just marketing. On the other hand, marketing language like “military-grade” or “industrial strength” on budget connectors and brackets is rarely backed by any actual certification and shouldn’t influence a buying decision on its own. Similarly, a high maximum surge rating on an inverter sounds impressive but matters far less than continuous wattage rating for most real-world use, since surge capacity only applies for a few seconds during appliance startup — don’t let a big surge number distract from checking whether continuous wattage actually covers your everyday loads.
Frequently Asked Questions
❓ Do I need a combiner box if I only have two solar panels?
❓ Can I mix Renogy and Victron components in the same system?
❓ What size charge controller do I need for a 400W solar panel setup?
❓ How long do MC4 solar connectors typically last?
❓ Is a pure sine wave inverter really necessary, or will modified sine wave work?
Conclusion
Building out solar panel parts and components isn’t about buying the most expensive option in every category — it’s about matching each piece to how you’ll actually use the system. A weekend van-lifer with a single panel has very different needs than someone running a full off-grid cabin on a multi-panel array, and the seven products covered here span that entire range, from a sub-$20 connector set to a premium Bluetooth-enabled battery monitor. What matters most is treating the “boring” components — connectors, mounts, combiner boxes — with the same care you’d give a charge controller or inverter, since a $15 bracket failure can just as easily take down your system as an underpowered controller.
Start by sizing your array and battery bank honestly, then work outward from there: charge controller and inverter first, connectors and mounting hardware next, and a battery monitor as soon as your budget allows. Whichever combination of the Victron SmartSolar MPPT 100/30, Renogy Rover 40A MPPT Charge Controller, Renogy 5-Pair MC4 Solar Panel Cable Connectors, Renogy Solar Panel Mounting Z Brackets, Renogy 5 Strings Solar PV Combiner Box, Renogy P2 2000W Pure Sine Wave Inverter, or Victron BMV-712 Smart Battery Monitor fits your build, always check the current listed price and verify current availability before you buy, since solar equipment pricing shifts fairly often.
Recommended for You
- 7 Best Replacement Solar Panels for 2026 (RV, Off-Grid & Home)
- Quiet Propane Generator: 7 Best Picks for Silent Power (2026)
- Off Grid AC: 7 Best Solar & Battery Options for 2026
Disclaimer: This post contains affiliate links. As an Amazon Associate, I earn from qualifying purchases made through these links, at no additional cost to you.
✨ Found this article helpful? Share it with someone who needs it! 💬🤗